


Here at Rain or Shine, we love to encourage a DIY project. That’s why we put together this helpful guide to building your own golf simulator. We'll show you some easy DIY Golf Simulator ideas that will help you build your own simulator without breaking the bank.
Play your cards right, and you might even end up with a setup that looks something like this...

What You Need For A DIY Golf Simulator Build
Necessary Items
1. Hitting mat
2. Impact Screen & Enclosure or Net
3. Launch monitor with golf simulation software
4. PC or iPad
5. Projector (if using an impact screen)
BUILDING A DIY GOLF SIMULATOR ENCLOSURE
How hard is building a golf simulator enclosure? It actually may be easier than you think!
The build typically will consist of EMT Pipes and connectors (which are available at most hardware stores), an impact screen, heavy-duty curtains to act as the enclosure, and some bungees for fastening the screen to the EMT pipes.
We get a lot of inquiries from golfers wanting to know how to create a diy golf simulator setup. So we've created a set of DIY Golf Simulator Enclosure steps that you can follow for your project!
The Overview
There are 3 essential parts to every golf simulator enclosure:
- 1. The Screen
- 2. The Frame
- 3. The Enclosure Surround
See the image below to see a diagram of our recommended build out.
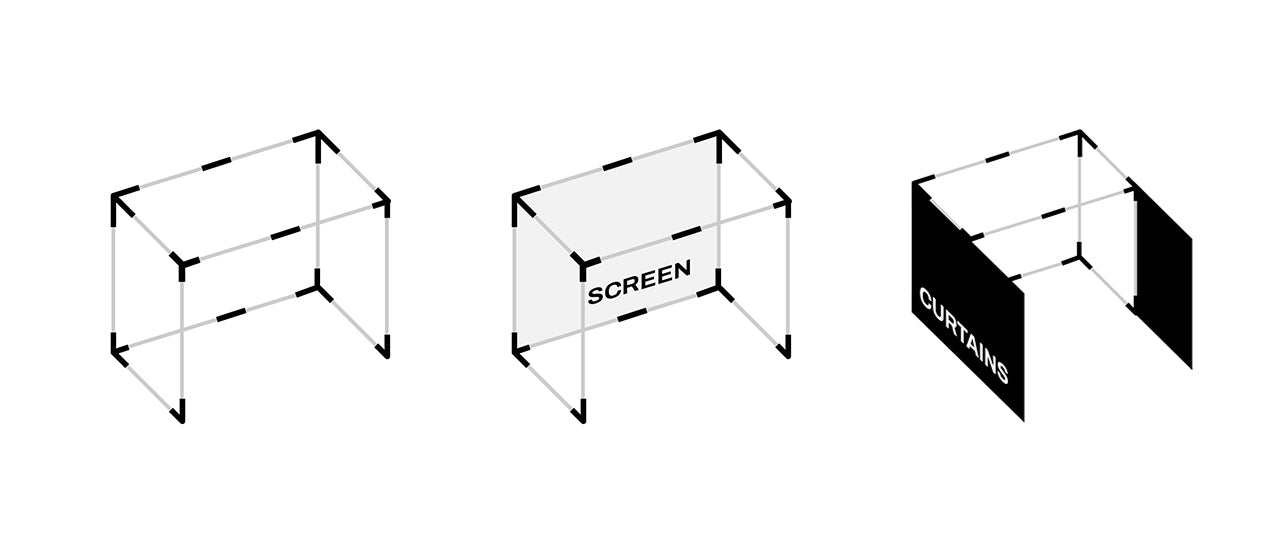
Examples of the Build
Here is an example of what the build can look like:
1. WHAT TO USE FOR THE SCREEN
It will make your build a lot easier to start by picking an impact screen. The screen you go with will largely depend on how much space you have and your budget.
Or if you already own a projector, you may want to choose a screen size that will pair well with your projector specifications. You can check out our screen size calculator to find the optimal screen size based on a projector you already own.
But overall, screen size is totally up to you. Going the DIY route gives you a lot of flexibility!
SHOP GOLF IMPACT SCREENS2. BUILD THE FRAME
The Frame

HERE'S WHAT YOU'LL NEED

1. Determine frame width and height based off your chosen screen size.
We recommend making your frame 1/8" - 1/4" bigger on each side than your screen. For example, if your screen is 120" x 90" - make your frame 120.5" x 90.5".
When you go to attach your screen, the bungee based system will give you some flexibility if your screen is smaller than the frame. And this small space can ensure your screen is a tight/stretched fit and not loose and baggy.
As far as the depth of your enclosure frame goes, we recommend a depth of between 2-5'. If you are planning on securing the frame to the wall or ceiling, you can get away with a narrower 2' frame. But if the enclosure will be freestanding, you'll want 3-5' of depth for added stability.
2. Cut 1" EMT pipes to size using a pipe cutter or miter saw with a blade fit for metal.
3. Insert pipes into 3-way pipe connectors, fastening with their included hook screws
And that's it! Your frame is ready to go!
3. ATTACH SCREEN TO THE FRAME
Attaching the Screen

To attach the screen to the frame, we recommend using a box of ball bungee cords. These will give you a lot of flexibility if you ever need to disassemble your simulator. But you could also use something like a zip tie!
Simply loop the cord side of the bungee through each hole in the screen, wrap around the frame, and loop the ball through the cord.
4. INSTALL SIDE CURTAINS
Adding the Curtains

Side curtains are a great way to create an affordable enclosure for your screen. Some people will wrap the frame with a vinyl covering. But curtains are a lot easier to setup and look good! Check out our DIY Golf Simulator Curtains that can be paired with a curtain track for easy installation
Using curtains, as opposed to some sort of frame fabric covering, also enables you to retract the curtains any time they are not in use. Which is great for garages or any other spaces where you might not always be using your simulator
Just attach the track on the ceiling directly left and right of the frame so that it lines up snug with each side of the frame. Make the width of your curtain tracks the exact same width, or even slightly narrower, than your frame width.
Making the two curtain tracks slightly narrower than the frame will allow the curtains to drape over the frame which ensures a snug fit that will cover up the sides of the frame. Then attach the curtains to the track!
DIY HITTING MAT BUILD
Building your own golf mat might be easier than you would think! If you are interested in the project, check out our Complete Guide to Building Your Own Golf Mat.
Our guide will cover all the steps and materials you need to build a hitting mat for under $100!
Building your own mat will save you some money, but you most likely will sacrifice a little time and quality. So we understand if the DIY Mat project isn't for you.
AFFORDABLE GOLF MATS YOU CAN BUY
If you don't want to build your own mat but still are looking for a quality solution that's affordable, then check out our top recommendation below!
The SwingTurf Golf Mat

The SwingTurf Golf Mat is one of the most realistic feeling mats on the market. It's easy on your joints over long sessions and even accepts real tees. For the price, it's one of the best mats on the market.
BUY SWINGTURFTHE LAUNCH MONITOR
There are a lot of options when it comes to launch monitors with golf simulation capabilities. Many golf DIY'ers will build their own hitting enclosure so that they can spend more money on the launch monitor. While other's may want an all-around affordable solution. Here are the best launch monitors with golf simulation for every budget.
GOLF SIMULATOR PROJECTOR
Unfortunately, there aren’t a lot of ways to skimp on the projector. You can purchase a cheap projector for a $100-$400 but most likely you will end up with a fairly sub-par system that has a dull projection and is not ideal for short-range projection. To get a solid display we recommend around 3000 lumens and a short-throw ratio between .3-1 and .9-1. These two specifications will give you the brightness and screen resolution that is ideal for golf simulation.
You’ll also need a projector mount. Luckily these are fairly inexpensive. Our high quality Golf Simulator Projector Ceiling Mount is only $79. Alternatively, you can purchase a Projector Floor Enclosure. These are a bit more expensive but you don't have to worry about mounting the projector on the ceiling.
If you are interested in learning more about projectors you can read our guide on the Best Golf Simulator Projectors.
GOLF SIMULATION SOFTWARE
Most launch monitors do not come with their own native golf simulation software and will require a 3rd party software. But there aren't a ton of options out there, which has resulted in a few options dominating the golf simulation market. Those are GSPro, E6 Connect and The Golf Club 2019 (TGC 2019).
These simulation softwares are fantastic options. You'll find just about all courses played on the PGA Tour with these options, but due to naming rights, all the courses are named something slightly different. Augusta, for example, is named Magnolia. So when searching for courses you'll have to weed through some options and look up the correct course name on golf simulator forums.
OTHER DIY BUILDOUT CONSIDERATIONS
HOW MUCH WILL A DIY GOLF SIMULATOR COST?
The cost of a DIY Golf Simulator can vary depending on how DIY you go and what launch monitor you choose. But the launch monitor will most often be your biggest expense ranging anywhere from $500 - $10,000 typically.
In general, here is a breakdown of the expected expenses:
The Enclosure and Screen: $500-$1,500
The Mat & Turf: $100-$1,000
The Launch Monitor: $500-$10,000
The Software: $995
On average, you should expect to pay around $5,000 - $10,000 for a quality DIY setup.. You can create a setup under $3,000 if choosing a lower priced launch monitor or if using a net vs a screen and enclosure.
HOW MUCH SPACE WILL I NEED?
The great thing about a DIY Golf Simulator, is that you can easily customize the size based on how much space you have.
But at minimum, you will most likely need 8' of Width, 8-9' of Height, and 10' of Length. An average sized bedroom can typically fit a smaller sized golf simulator.
However, if you have lots of space, you can go with something like a 12' screen and create an immursive simulation experience. If you want an average to large-sized golf simulator, then plan for 12' of Width, 9' of Height, and 16-17' of Depth. But keep in mind:
The wider the screen, the more length you'll need for projection
When determining how much space you'll need for your simulator build, keep in mind that the bigger the screen, the more room you'll need for your projector. That is assuming you want to fill up the entire screen with the projection. Head over to our Projector Throw Distance Calculator to find out how far you'll need to place your projector from the screen in order to fill up your screen.
CONCLUSION
If you build your own enclosure and source many of the components mentioned in this guide, you can build a quality home simulator setup for under $5,000! Keep in mind that the projector and projection screen are optional. If you are going the DIY route, then the projector and screen will be your biggest cost outside of the launch monitor. By watching your shot on a computer or tv screen you can save around $1,000.
The experience won't be as realistic, but still very fun!
Even if you choose to purchase a few items or purchase a projector and screen, you should still be able to build a golf simulator for between $1,000-$5,000.
We hope this guide has given your dreams of owning your own golf simulator a better outlook. And at the very least we hope that we have given you some helpful ideas and inspiration to build your own golf simulator. To learn more about our top Simulators check out our Best Golf Simulators Page. Be sure to tag us on Instagram @rainorshinegolf or Facebook @golfrainorshine with what you come up with! Good luck!